


I hope you’ll find it reassuring to learn that I do 95 percent of my cookie decorating with this simple DIY tool, also called a cornet. Rarely do I go as far as rigging a reusable bag with a metal tip, mostly because there’s nothing I dislike more than reaching into a goopy bag to remove the coupler for cleaning. (The coupler is the set of two plastic pieces that holds the tip to the bag.) The same cleaning issue goes hand in hand with squeeze bottles. By contrast, cleaning a parchment cone is completely unnecessary: just snip off the tip, squeeze out the leftover icing, and toss out the cone.
Call me lazy if you dare, but cones have performance advantages too! First, I can cut extremely tiny holes in them (smaller than any pastry tip), which allows for very detailed decorating. Second, the tension in the paper makes them easier to control than squeeze bottles, disposable plastic piping bags, or baggies with holes cut in their corners, which are often used as substitutes – though floppy ones, at best. What’s more, disposable plastic piping bags are usually seamed along the edges, which means you’ll never get a perfectly round line if you pipe through them without a tip. And they’re not biodegradable, which brings me full circle to the dreaded cleaning issue . . .
Granted, making parchment cones takes some practice at first. But it’s kind of like riding a bike: once you’ve got the hang of it, it becomes second nature. This 8-step method, complete with step-by-step photos, is a great place to get started. If you want more help after reading this, check out Lesson 4 in my cookie decorating video series.
Note: Though I’m a die-hard cone user, I use pastry bags fitted with metal tips when I’m seeking a highly textured look to the icing, such as for basketweave, ruffles, or grass/fringe effects. There’s really no way around bags and tips in these circumstances.
What you’ll need for two or more cones:
To make:
1 | You can buy pre-cut parchment paper triangles for making cones, but I prefer to use ordinary parchment paper on rolls for making mine. It’s easier to find and less expensive (per cone); plus, it has some built-in curvaceousness, which makes it easier to shape into cones. Start by cutting a perfect square of paper off the end of the roll. The more perfect the square to start, the easier it will be to apply my litmus test in Step 7 that tells you if you’ve made the cone properly. Cut the square along the diagonal to end up with two isosceles triangles – that is, two triangles, each with two equal sides and one longer side. You will get one cone from each triangle. Note: If you use parchment paper from a standard (15-inch-wide) roll, the cone should end up 7 1/2 to 8 inches long and about 3 1/2 inches wide at the mouth. If you prefer working with a smaller or larger cone, then start by cutting smaller or bigger isosceles triangles in this step.

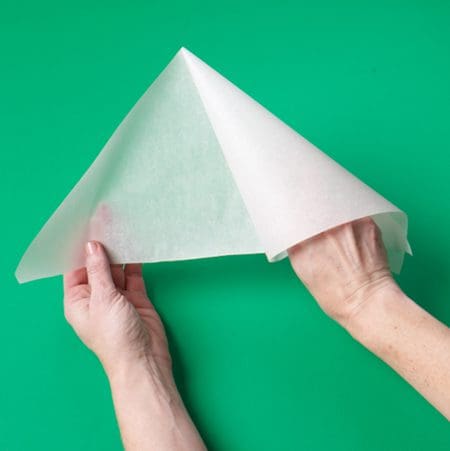
2 | Hold the triangle from the corners on either end of the long side, with the long side facing away from you. (Also, hold the paper so that its natural curve is facing up. It will be easier to shape the cone in the next step if you’re not fighting the bend in the paper.)

3 | Turn in the right (or left) corner to make a half-cone with a point (or tip) at the center of the long side of the triangle. Be careful not to over-rotate the paper; if you do, your cone will end up very small and narrow. If you’ve properly rotated the paper, the right (or left) corner and corner facing you should be closely aligned, as pictured in the bottom right of the third photo.
4 | Guide the other half of the triangle around the half-cone just created.
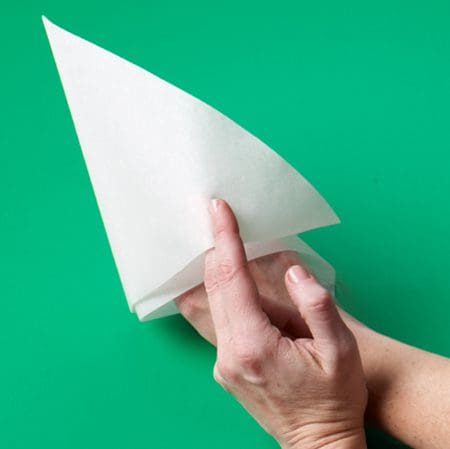
5 | Rotate the cone, so that the corners of the triangle face you. Grab onto all three corners to keep the now fully formed cone from unraveling.

6 | Check the tip of the cone. If it’s open at all, as it often is at this point, gently pull the outer corner of the cone toward you to shimmy the hole completely closed. You may need to pull a bit on the innermost corner, too. (I like to start with no hole to give me the ultimate flexibility to later cut the hole as small or large as I like.)

7 | Here’s the litmus test I spoke of earlier: if you started with a perfect square and made the cone properly, the three corners of the triangle should be spaced equidistant from one another (1 to 2 inches apart) at the open end of the cone.
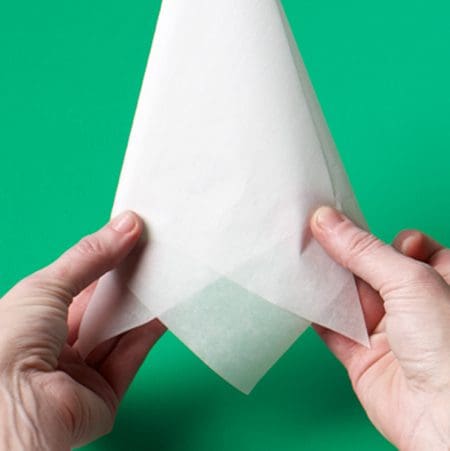
8 | To keep the cone together for good, fold down the corners to the outside of the cone (and to the height of the rest of the cone); then tear or cut a notch at the point where all three corners intersect. Voilà, you’re done.
Now practice this one more time with the remaining triangle. And again with another square, until you can make cones with your eyes closed!
Need more help? Check out Lesson 4 in my new video series, available here or in the link below, to watch me making a parchment cone.